Fava bean and pea crostini

I don’t know when it started, but in the past few years, my good friend Jennifer has become obsessed with horse racing. Her unbridled enthusiasm has gotten our entire group of friends interested as well. Such is the beauty of a well-tended obsession. She recently had a Belmont-watching party, and I must say, watching American Pharoah win the Triple Crown – the first horse to do so in 37 years – was surprisingly emotional and stupendously thrilling. 

I wanted to take an appetizer capitalizing on what was ready to harvest in my garden and an adaptation of Jaime Oliver’s “Incredible smashed peas and fava beans on toast” was just the thing. I love Jaime Oliver. He’s so enthusiastic and accessible. Not to mention adorable. I love all his cookbooks, but I especially love Jaime at Home. It’s seasonally based around his amazing kitchen garden and is full of beautiful photos and growing information. There’s a show too. It’s like the cookbook come to life. I can’t get enough.

I bought a baguette, some lemons, and some parmesan. And while I was at the farmer’s market, I picked up some gorgeous fromage blanc from White River Creamery (http://www.whiterivercreamery.com).

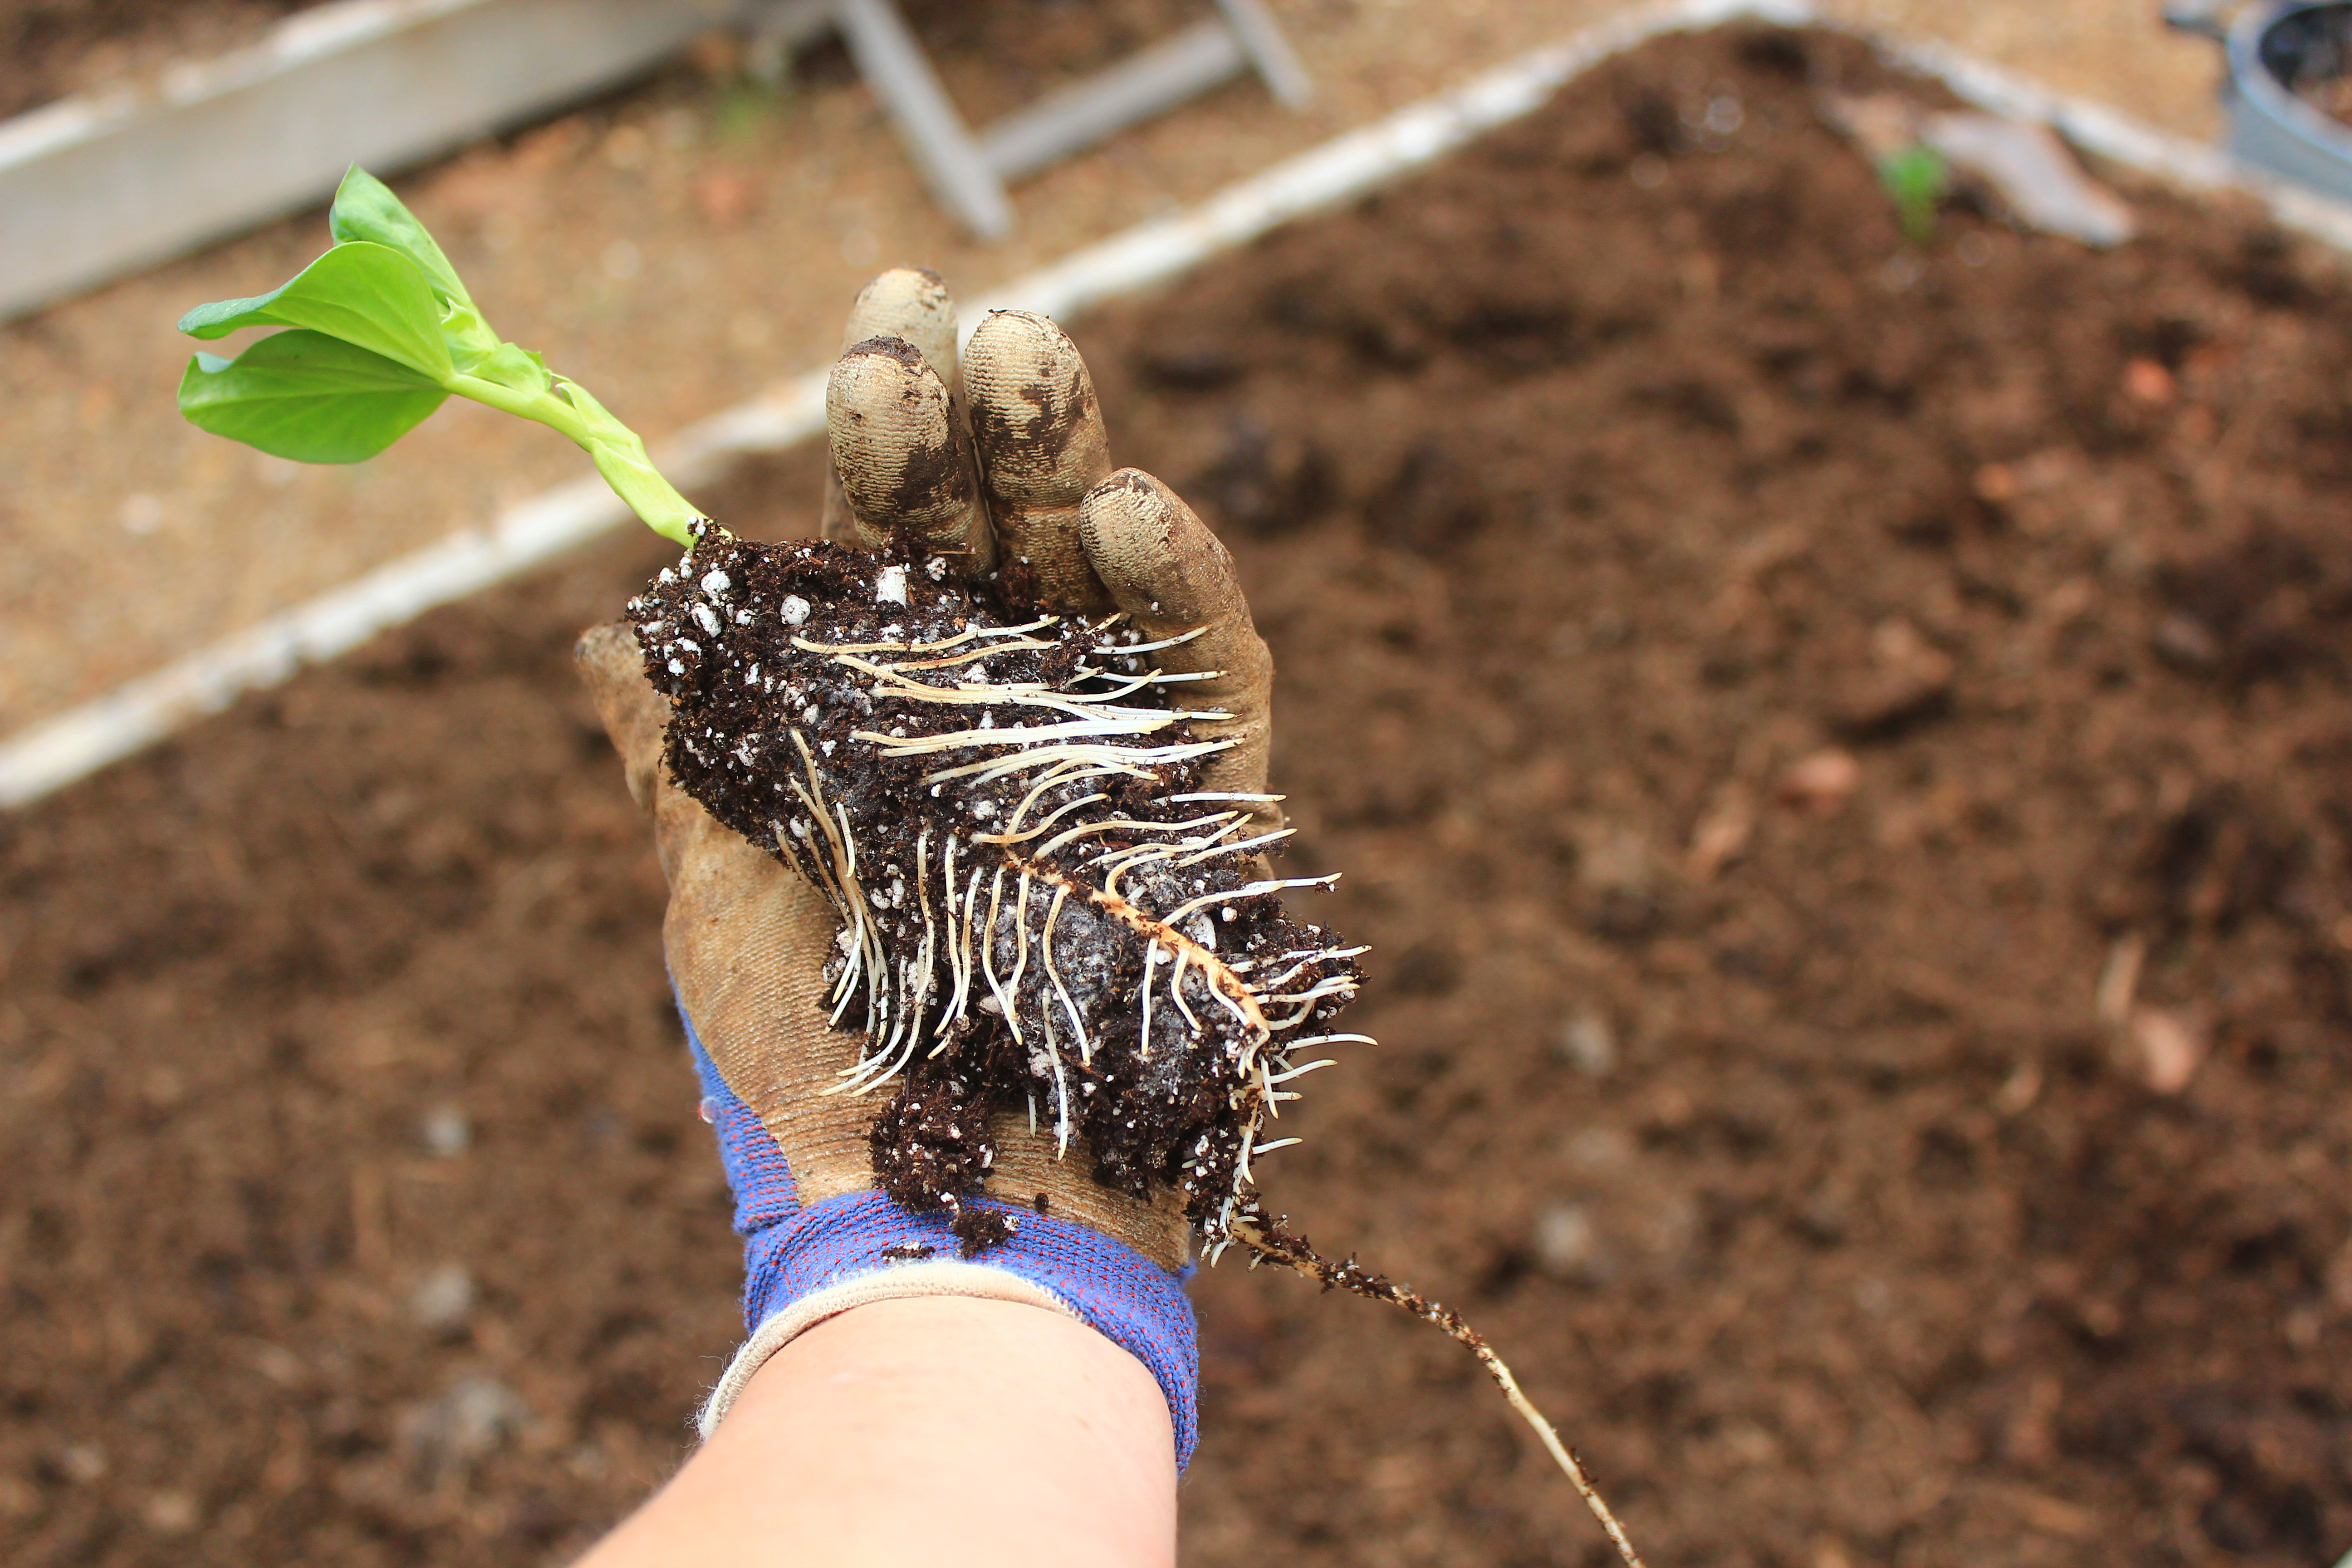
Then I harvested peas and fava beans. 

IMG_8382

IMG_8407

I would be lost without those little scissors. I use them to harvest almost everything. Favas, peas, beans, peppers, tomatoes, herbs. There are few things more frustrating than ripping off an entire stem when you only meant to get a pepper. Plus a clean cut is important because it leaves less of an entrance for diseases to enter. I also just like scissors in general. I find them the perfect embodiment of form and function. I think these babies are particularly attractive. Photogenic too. I picked them up at Pearl River Mart in New York (http://www.pearlriver.com) with no idea they would serve such a purpose in my life. I also like this basket for harvesting. When it’s cooler I use a big stainless steel bowl, but once it starts to get hot, they heat up so quickly that they’re no friend to tender legumes and leaves.

Watch your back. This guy is notorious.

IMG_8404

I also harvested some radishes and mint.

IMG_8217

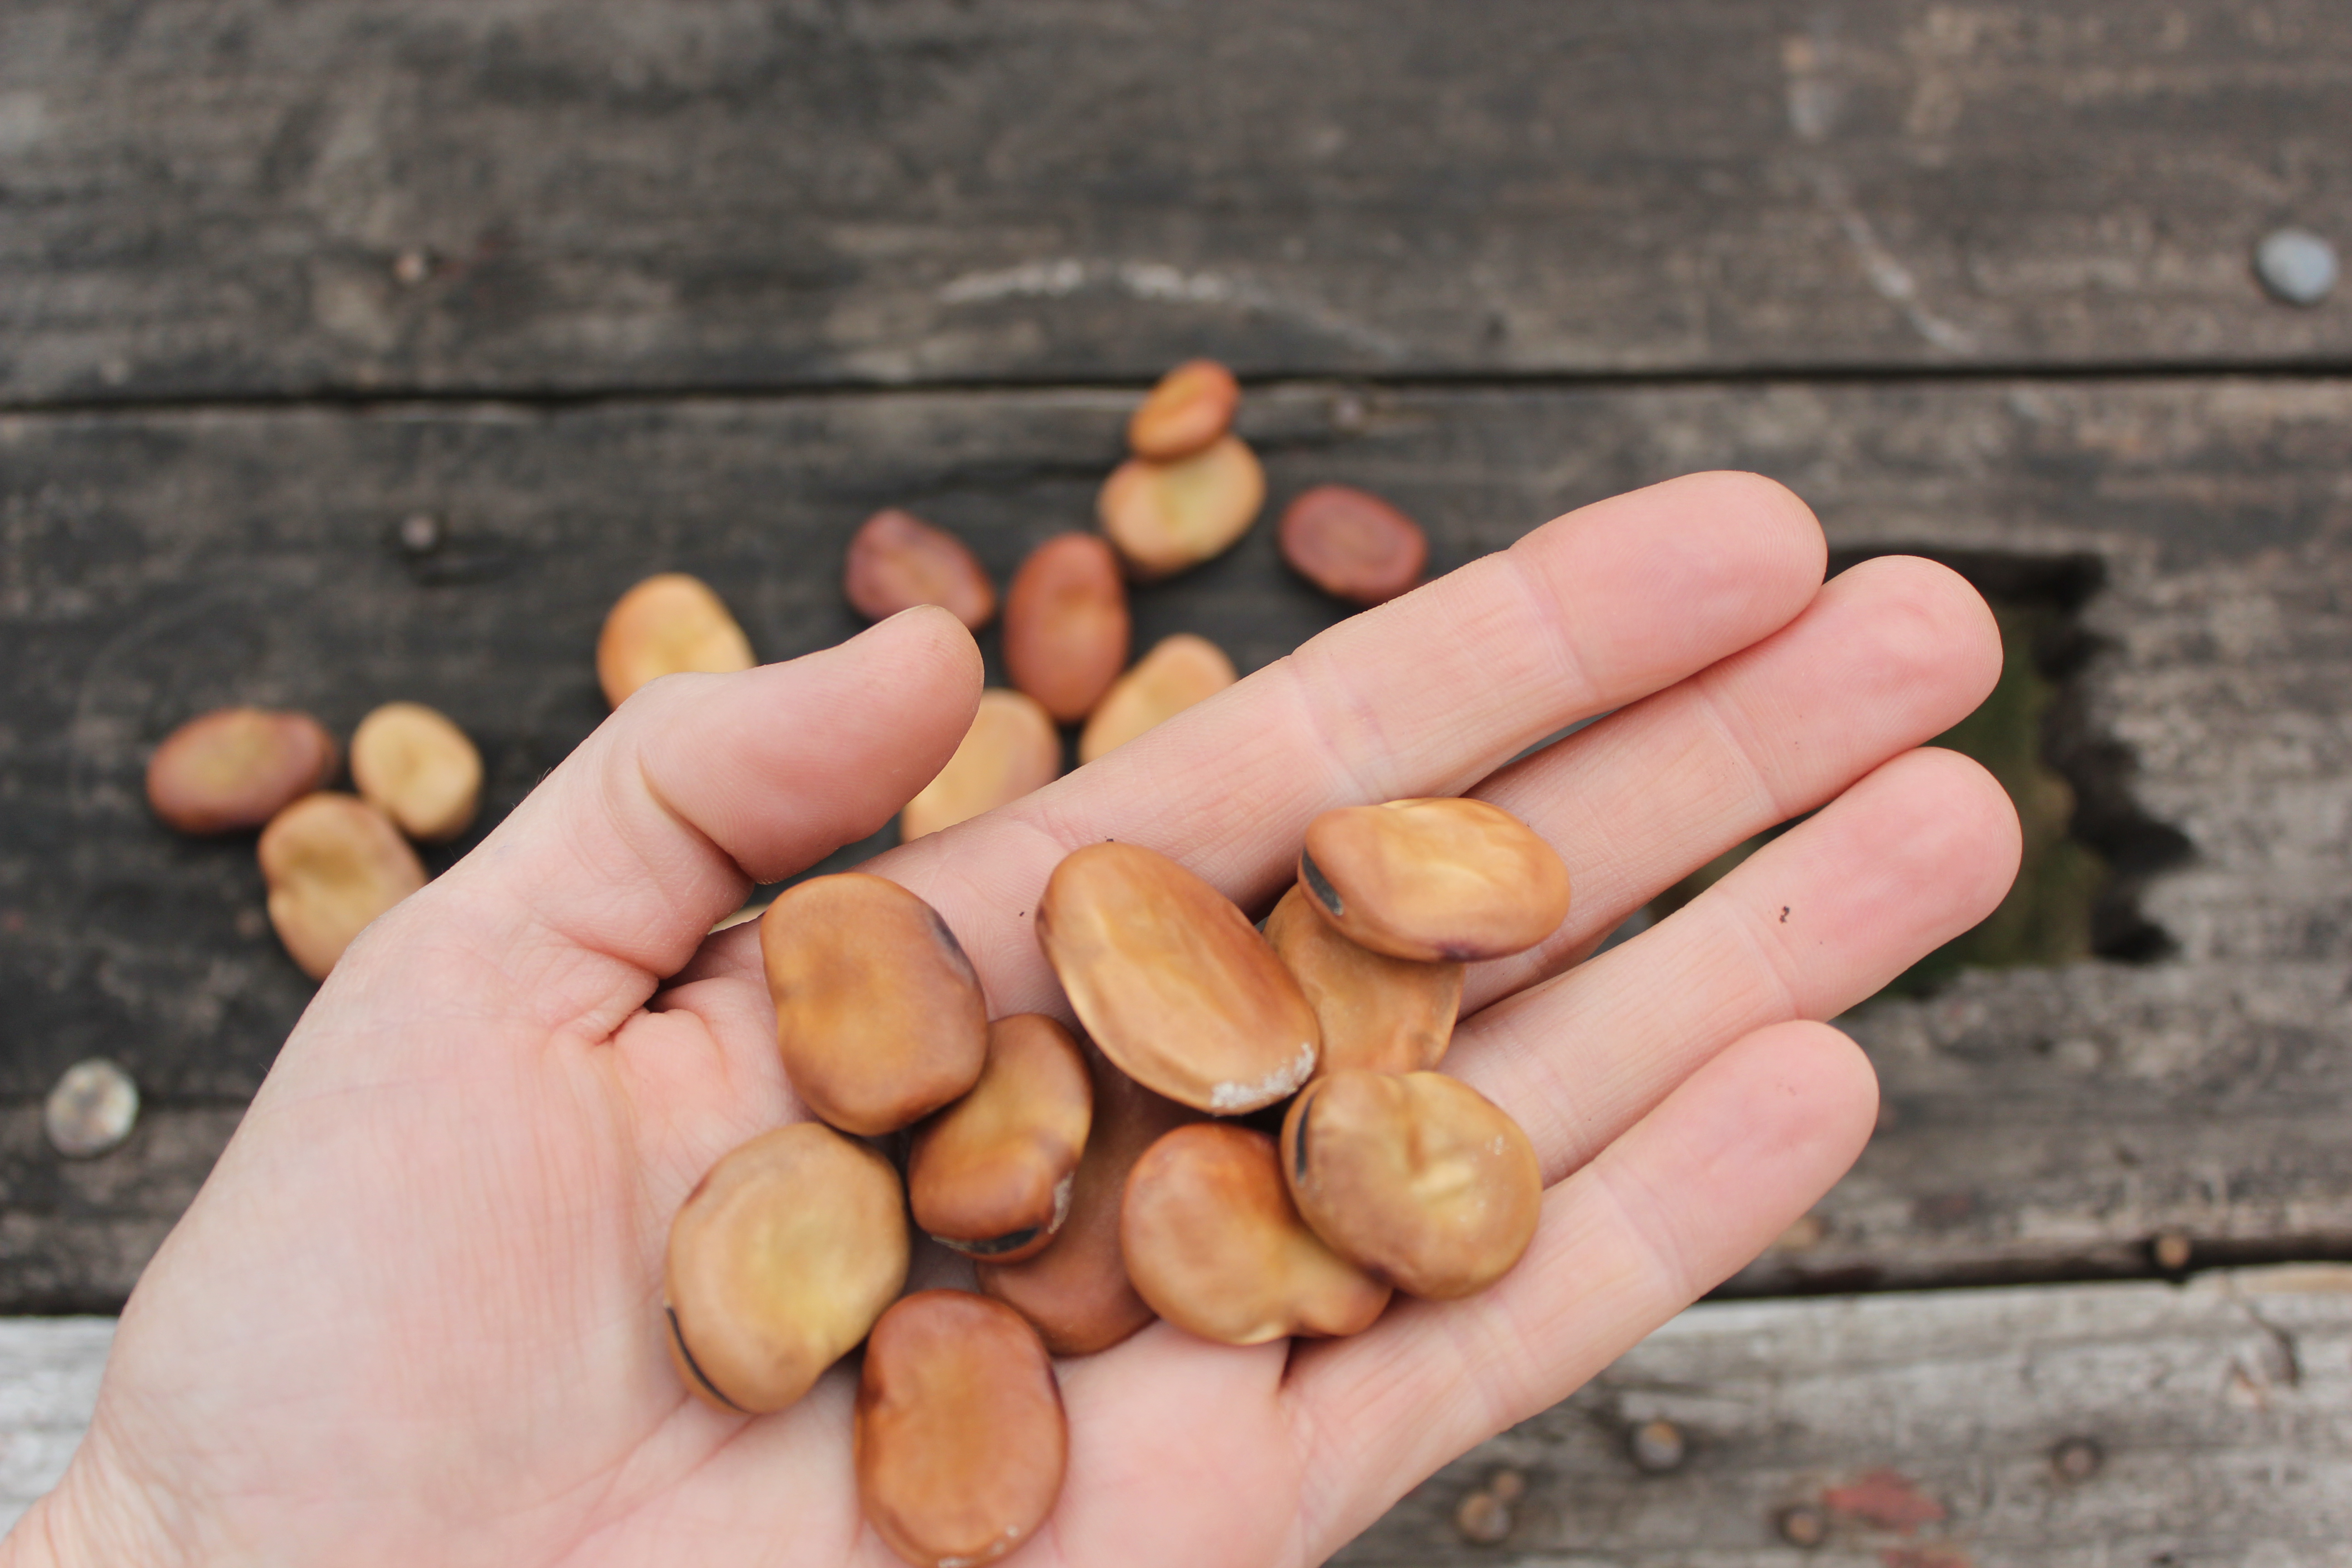
There’s always an opportunity for a moment of zen when you’re shelling legumes. So even though time was ticking to make it to the party, and I was documenting, I tried to take it.

IMG_8238

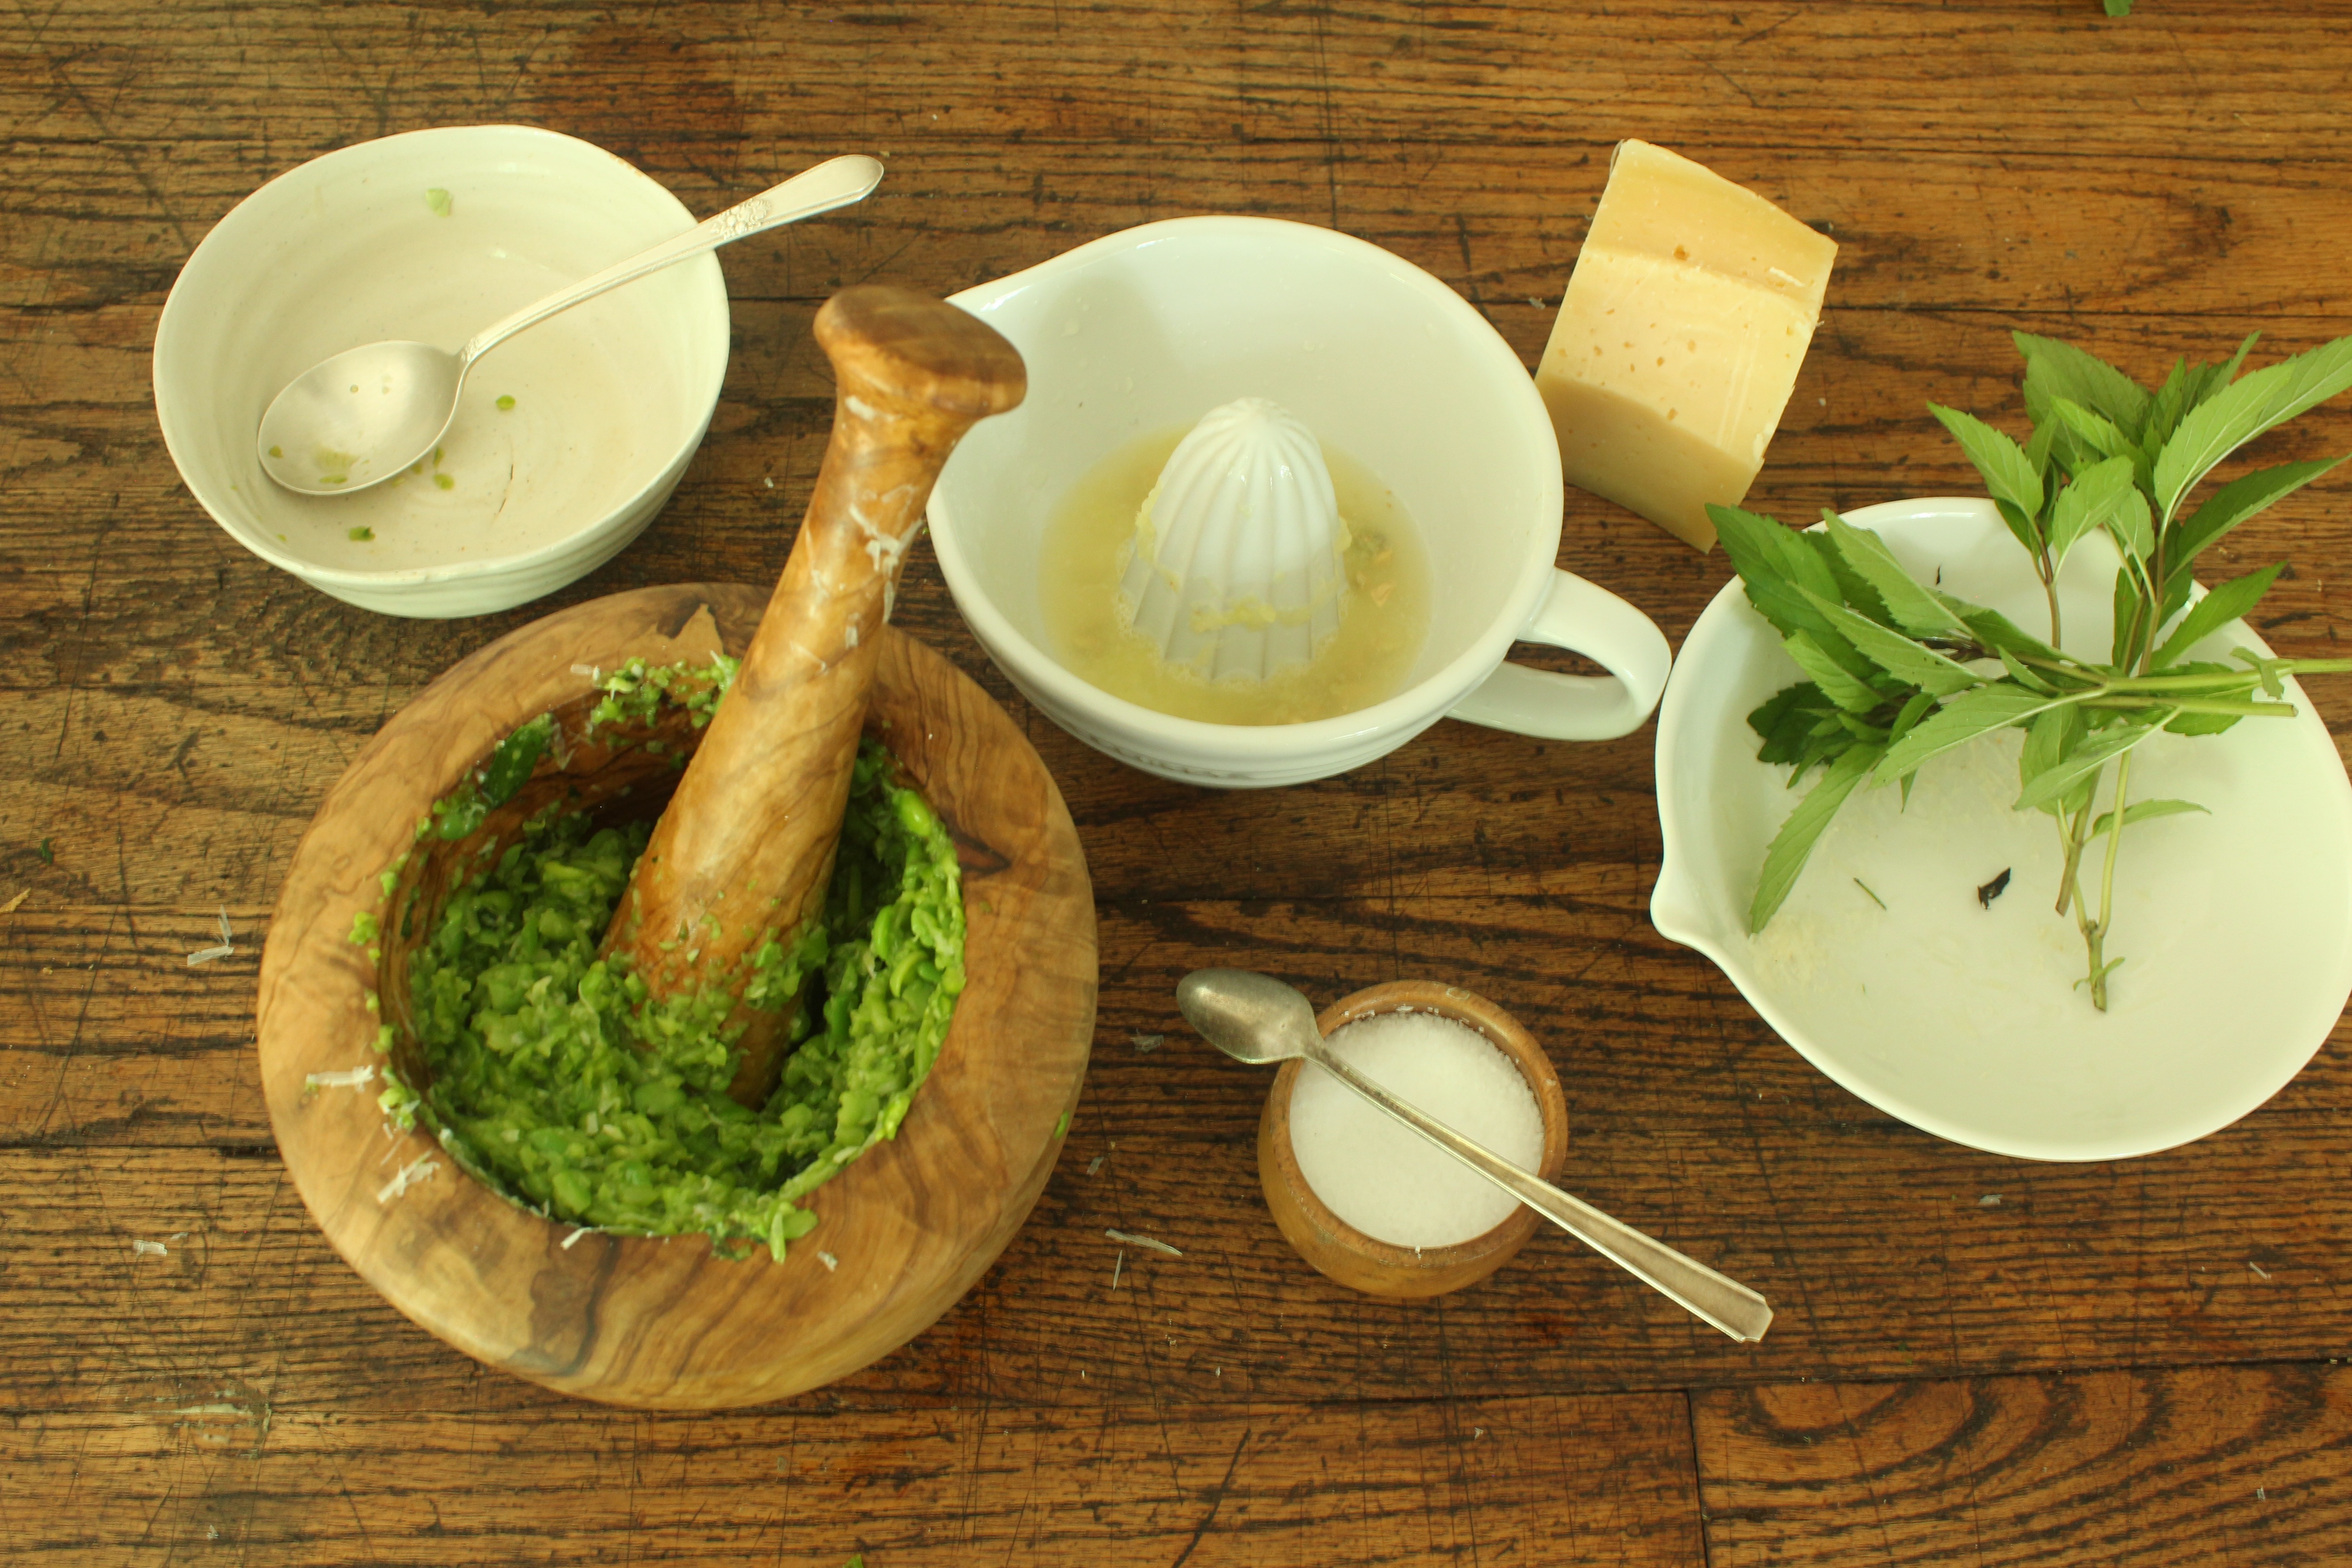
Once your beans and peas are shucked, put some of the raw peas, a few mint leaves, and some salt in a mortar and pestle.

IMG_8261

And, as Jaime would say, bash ’em up!

I must admit, I don’t have the right mortar and pestle. I tried both of mine. And while I love them both as objects, what I really need is one of those molcajetes that they make quacamole in. Something with a little more grit. It all worked out eventually, but I did break a sweat.

When you get a nice mash working, start to add your fava beans. Jaime used his raw, but I blanched and peeled mine. Once everything is good and pulverized, add some olive oil to make it creamy, plus some parmesan to ground all that freshness. And then kick it into gear with some lemon juice. Keep tasting until you have the perfect balance of bright creamy salty freshness.

IMG_8266

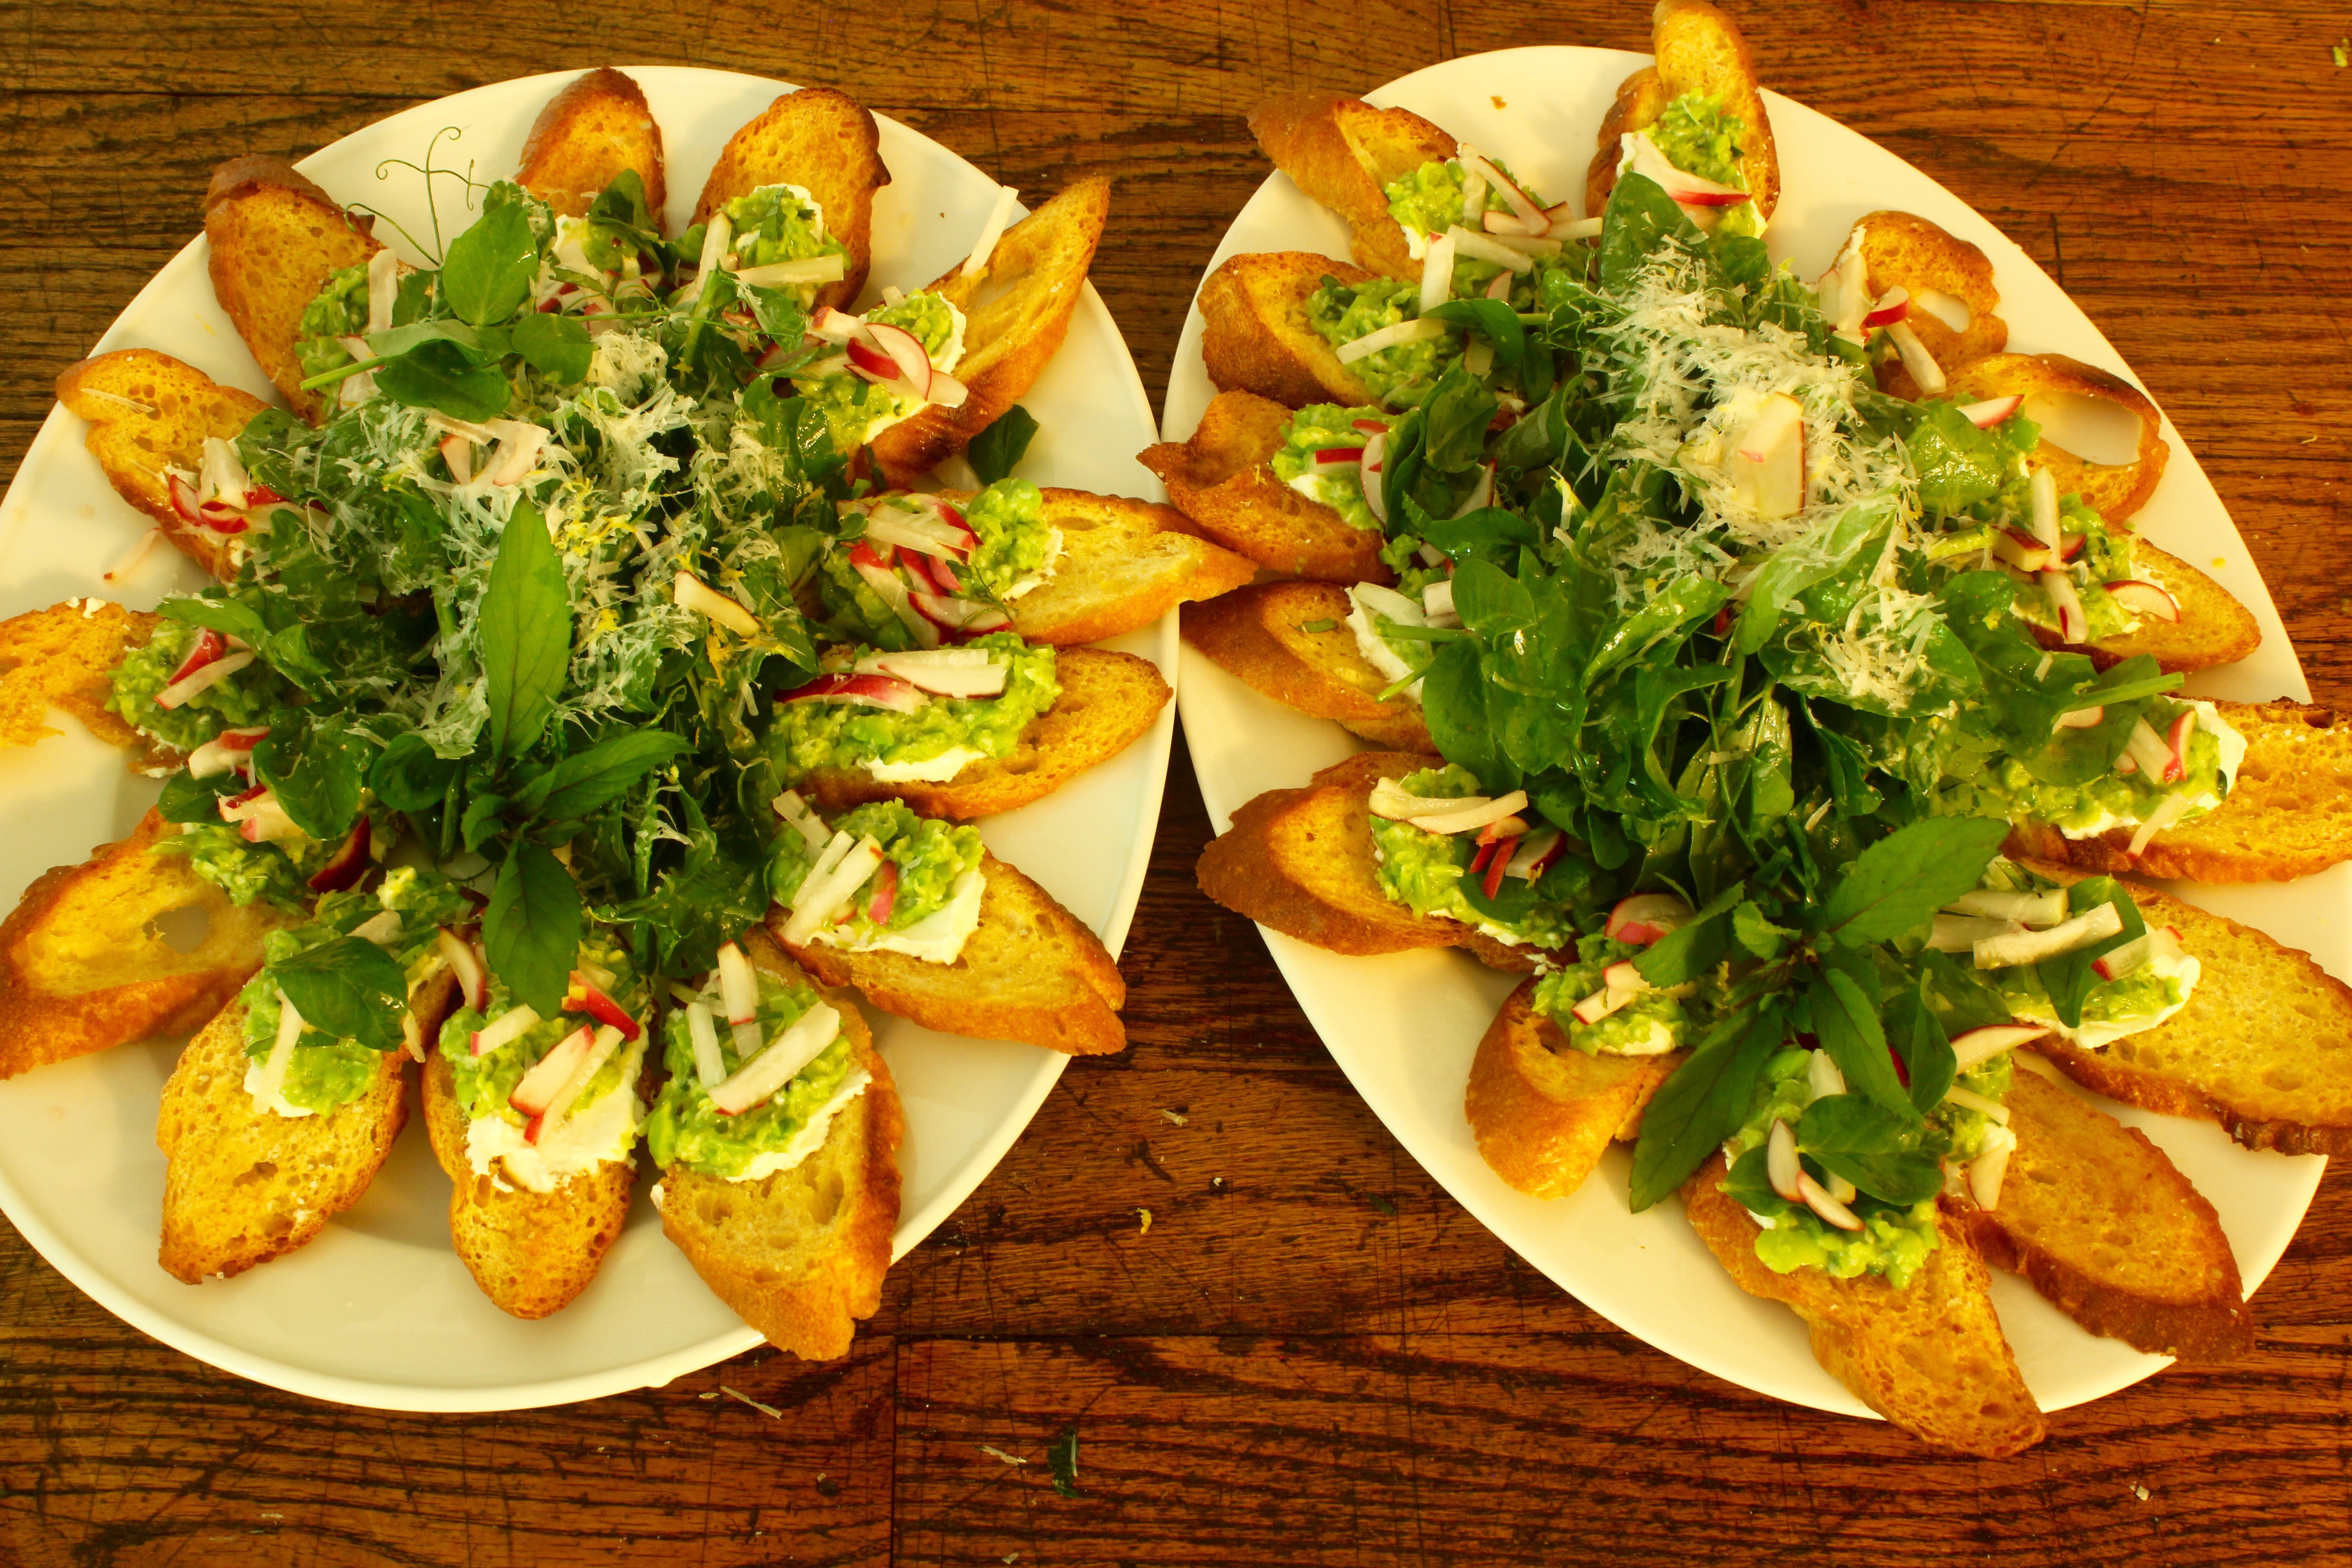
Now you may not have fava beans hanging out in your garden waiting for you to fulfill their destiny, but this next bit is a keeper. Crostini. “Little toasts.” They are a cinch to make and are the perfect vector for truly endless numbers of toppings. Slice a baguette thinly, brush with olive oil (a little brush for olive oil is a really handy tool to have around), sprinkle with salt and pepper, and pop in a 350º oven for 15-20 mins. Voila! They only challenging part is getting them golden brown without burning them. I was feeling fancy, so I smashed a garlic clove and gently rubbed it on mine. I broke a couple, so I had to be extra gentle. But then I had testers.

IMG_8244

I made a little salad with julienned radishes, pea shoots, lemon juice, olive oil, and salt.

Then, to assemble, I spread a little fromage blanc on each crostini, put some of my lovely green mash on, and topped them with the radish salad.

IMG_8269 (1)

I needed something for the middle of the plate, so I tossed arugula, pea shoots, a bit of mint, and some fava bean shoots with olive oil and lemon juice, tossed on the few remaining radishes, grated some parmesan and lemon zest on top, grabbed a bottle of wine out of the fridge and raced to Jennifer’s. Luckily she lives about two minutes away, so I just took the platters as they were.

IMG_8275

Thanks for the party Jennifer! And Congratulations American Pharoah!!!!!!!

SPRING PLANTING

St. Patrick’s day or not, Tuesday, March 17th was a big day in our garden. David and I both had the day off, it was warm and sunny with rain scheduled for the next day, and the soil was finally workable.

Do you know this term, workable? Many early seed packets will tell you to plant them “as soon as the soil can be worked.” This means that the ground is not frozen, and that it’s not too wet. Timing is tricky in the spring because you want to get stuff in the ground, but if you mess with your soil when it’s too wet you can seriously damage the soil’s fragile structure, causing it to clump and compact, something that is not easy to fix. Structure refers to the way soil hangs together, the relationship between the particles of soil and the pore space between them.  This relationship is crucial to your soil’s ability to hold moisture and air, for roots to grow through it, and for the millions of creatures living in it. Structure is different than texture which refers to the relative amounts of different sized mineral particles present in your soil (sand, silt, or clay). 

Soil is amazingly complicated stuff and is worthy of our deepest respect, but let’s not get into that right now. Suffice it to say that the timing was right and Tuesday was the day.

Incidentally, the best way to improve your soil’s structure is to add organic matter which also feeds your plants and enhances your soil’s capacity to hold moisture.  This is a task that is best done in the fall (because of those spring timing issues), but we didn’t get to it last fall, so we did it Tuesday.  Better late than never.

As a conflicted American consumer, I can find a million things to feel guilty about. When I lived on the East Coast in an apartment with an outdoor space, but no dirt, and no compost situation I never got used to not composting. For seven years, every time, seriously, every time, I threw food in the trash it bothered me. So one of the first things I did at my new place was establish a compost situation. It’s a pretty simple set-up, but I sleep better for it.

IMG_7075

The enclosed middle compartment is this season’s working compost. That’s where I put kitchen scraps, yard waste, leaves, judicious amounts of ashes from the fireplace, etc. The left side has wire around it that you can’t really see, I put leaves in there (I should add more to it), the other side is where last year’s compost got turned so I could start a new batch in the middle. I’m not a master composter yet, but I aspire to be, and I actually made a batch of compost last year, which feels like a major step on the road to a self-sufficient closed-loop garden. We weren’t sure if it would be enough to add some to all of our beds though, so David got a scoop from Nitron (www.gardeniq.com) to supplement.

IMG_7076

Then, while I was planting carrots and radishes, David, Mountain Man that he is, did the heavy lifting and wheelbarrowed compost into all the beds. Then he mixed it in and we were ready to plant!

CARROTS and RADISHES

IMG_3165

I started with carrots and radishes because that bed was already prepared from when I planted garlic in it in November. At that time I added compost and worked it in and made sure that the soil was nice and friable. Carrots like loose soil, which makes sense if you’ve ever seen a crazy knobby two-legged carrot come out of hard rocky soil. I have nothing against those carrots, I love the way they are physical embodiments of the journeys they’ve taken, but I still made sure my soil was loose and light as far down as a carrot might grow. Then I made a shallow furrow across the bed.

Carrot seeds are tiny and it always seems like the wind starts blowing right when you want to plant them. (To avoid frustration, it’s also a good idea to open your seed packets indoors when your hands are clean and dry.)

IMG_7094

I sprinkled them as sparingly as possible down the furrow. Because they’re so light, it’s hard to plant them thinly. One of the tricks of growing good carrots is thinning them. I’m happy that anything wants to grow in my garden, so it can feel ungrateful to pluck out tiny seedlings just as they’ve seen their first light, very Sophie’s Choice. But if you want nice carrots, that’s the sacrifice, so when these puppies get 1-2” high I’ll snip some off at the soil line. Then later I’ll try to thin them so they’ve got space around them about the size of a mature carrot with a little room to spare, hopefully I can eat those tiny thinnings.

I spent a lot of time trying to decide which carrots to plant this year. I finally narrowed it down to three: St. Valery, an ancient orange carrot with very high reviews for taste, Amarillo, a neon yellow carrot with a reportedly sweet taste, and Purple Dragon, a spicy, purple carrot with a deep yellow core. Then Baker Creek sent me some free Parisienne carrot seeds, which I had been curious about, so I’m trying them too. They are little round carrots, which makes them a good choice for less than perfect soils. It sounds like Baker Creek sent them free to everyone, and made them a lot of fans. I look forward to roasting them whole.

Carrots take a while to germinate and because I have a small garden, I’m always looking for ways to save room, so I like to plant radishes with my carrots. Radishes are quick. Once they germinate they provide shade for the slow spindly carrot seedlings. They also break up the soil for the carrots and are long gone before the carrots even get going. 

Radish seeds are bigger and easier to control. I placed them about 2” apart, then I carefully knocked a very light layer of soil over them and patted that down gently. I watered them with a watering can and then covered them with strips of burlap and watered those too. When the radishes germinate in a few days I’ll take off the strips and let the radish seedlings nurse the carrots along, keeping them all moist until it’s time to eat radishes! I’ll probably try to find room for some more carrots elsewhere and plant those in a month or so.  And once I’ve eaten the ones I just planted, I may plant some more there. Successive planting is a great way to make sure you have a crop all season. 

IMG_7103

Below is the root bed on May 23rd last year. You can see the carrots peeking out from under the radishes in front. That’s chervil in the very back of the bed with bigger leaved parsnips in front of it. In the bed behind are onions. Chervil is a great spring herb and I need to get some planted for this year! It’s a lovely, delicate, cool-weather herb, like a feathery parsley with hints of tarragon.

IMG_4747

IMG_7095

Wilson loves carrots. I told him it would take a while, I hope he’s not waiting for them.

FAVA BEANS

Remember these guys? Here they are March 11th, eight days after being planted.

IMG_7025

Inquisitive little things, aren’t they? Like little Loch Ness Monsters. Each checking out the situation in their own way. “Hi, have you gotten the schedule yet? What’s next?”

IMG_7022

And busy! We went away for the weekend and came back to these rowdy teen-agers. 100% germination!

IMG_7107

They got caught in the rain earlier in the week and were wetter than I wanted them to be, plus they were starting to get a little moldy. David took one out to examine it and saw that they had crazy tap roots, so we decided we’d better get those kids in the ground!

Their root systems really are amazing. Look at this action! Exquisite!

IMG_7112

And yes, I realize the whole point of the loo rolls was to leave them in place and not disturb that elaborate ladder of a root system, but then I read in Barbara Damrosch’s indispensable The Garden Primer (1988), that she had noticed when she pulled up spent crops in the fall that often the peat pots they were planted in were still quite intact. Ultimately, I decided to carefully remove the loo rolls (I put them in the compost) and plant them gently in deep holes. Luckily they got nicely rained in and so far they look really happy.

On to the next!

FAVA BEANS

IMG_4320

Fava Beans, (Vicia faba) aka Broad Beans, involve you in a labor of love.  They have a short season, are hard to find, expensive when you do find them, and are laborious to prepare, but I adore them so I grow my own.  I admire the way their pods are lined with fluffy white batting, like some precious gift sent through the mail.  I love their nutty, creamy, texture and the way they taste like fresh green sustenance after a cold brown winter.  I love to pair them with their fellow spring compatriots – peas, asparagus, artichokes, mint, and arugula – in a salad or pasta.  If eating that crew doesn’t make you feel alive, I can’t help you.  They’re great in a frittata or mixed with goat cheese as a dip for crudites.  I don’t mind the work it takes to get to that meaty morsel, it’s meditative, and if I serve them to you, it’s because I love you.  In the garden they are lovely plants.  Easy to grow and fairly unaffected by insects with handsome black and white flowers like they have somewhere fancy to be.

IMG_4746

You can even eat the leaves in a salad.  The flowers attract bees and other pollinators and as a member of the legume family they fix nitrogen leaving the soil better than they found it.  They are an ancient crop, believed to have been part of the Mediterranean diet since 6,000 B.C.  They are a great source of lean protein with no saturated fat or cholesterol, are high in dietary fiber and folate, and contain a number of minerals including iron, copper, manganese, calcium, and magnesium.  And on the off chance you have too many, they also freeze well.

IMG_6958

I’m growing two varieties this year; “Aquadulce”, a Spanish heirloom with large white beans and “Broad Windsor”, and old English favorite and the variety I grew last year.

I get a lot of inspiration from British gardening sources.  My all time favorite garden magazine is BBC Gardens Illustrated and I love to watch Jaime Oliver’s show “At Home” online and pause it to lust after his gorgeous kitchen garden.  A while ago I came across a video of a British gentleman planting fava beans in what he called “loo” rolls.  (I love how it sounds like Lou Rawls, and so much better than toilet paper rolls.)  I began collecting loo rolls myself.  They are the perfect container for starting fava beans as they’re deep enough to allow a nice root system to develop and they’re biodegradable so the whole thing can be planted causing no root disturbance.  With a little forethought, they’re readily available.

IMG_6949

 I found an inexpensive plastic bin at Home Depot, lined them up in it, and filled them with planting mix.  (I made a funnel with some rolled up paper which helped.)

IMG_6953

I soaked my fava beans in water overnight, popped one into each container with the dark eye facing downwards, made sure they were buried to a depth about twice their size, topped them up if they needed it, and watered them in.  I’ve also been saving my half and half containers to make plant labels.  I clean them out, cut off the top and bottom, slice open one side and cut them into strips.  They are somewhat waterproof and can be inscribed with a Sharpie.  

IMG_6966

They should germinate in 8-10 days.  Last year I direct seeded mine on March 15th. 

IMG_4661

Here they are (above) on April 26, 2014.  

IMG_4751

And again on May 23rd with potatoes above them, swiss chard below, and “Calypso” bush beans just coming on in front of them.  I hope by starting them a little earlier this year and growing two kinds, I’ll get to enjoy even more of them.

It should be noted that ingesting fava beans and even inhaling their pollen can trigger a hereditary disease, known as favism, in susceptible people of Mediterranean descent.  If you’re curious, you can find a lot more information regarding this online.

And by the way, the leeks I planted last week have germinated!  I promptly removed the plastic wrap and have put them where they can soak up some sun.  I’ll keep you posted!